
Tuesday, 17 December 2013
Final Design
I have located my Sculpture in the possible places around the John Lennon Art & Design building.

Monday, 16 December 2013


Wednesday, 27 November 2013
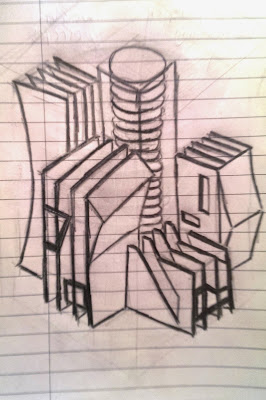
Concept
The initial concept behind my sculpture was to get across that the world around us is developing. Not just in the built environment but our everyday life, as the built environment is what we see and live around each day. I have chosen to locate my design at the John Lennon art and design building (Liverpool John Moores University Campus) as aspiring Designers are constantly in and out of the building. The subjects studied at this department are: Architecture, Spatial Design, Product Design, Fine Art, Graphic Design, History of Art, Fashion and Popular music studies. I want to provoke thoughts with Product and Architectural designers through the aspects of my sculpture as their form changes throughout. I have used the form of buildings in my design as an example to convey the meaning. My design conveys how over use of materials does not lead to a beautiful, elegant or sustainable outcome. In my sculpture, the features that are lower than others don't look functional or beautiful, BUT as the pieces of the sculpture grow they become more futuristic and sustainable by removing unnecessary features and weight (thus material usage and land consumption is less making it more sustainable). I have used buildings only as an example of potential aesthetic and sustainable developments that could be applied to the world we live in, but the concept represents more than that and is relevant to applied creativity in the broadest sense.


Tuesday, 12 November 2013
Rhinoceros 5: Designing my own model
I have recently started using Rhinoceros (Rhino Cad) as a part of my digital sculpture project. After choosing a design to develop into a model I produced the idea on the programme with a basic understanding. My skills on the programme are still quite basic however I began to challenge myself by rending my model and inserting light sources. Below you will see my first attempt at creating and rending my own model on Rhino Cad.


< Developments >
Further developments produced on Rhinoceros


Rhinoceros 5: Familiarization and Creating
Rhinoceros (Rhino Cad) is specialist
software made easy that enables the user to produce precise and beautifully
rendered CAD, if used to its full potential. After using some other 3D
programmes like Google Sketch-up and Pro desktop I realised that Rhinoceros is extremely
technical yet all the tools available on the software are easily accessible.
As well as having tool bars surrounding the
workspace it also has a command bar in which the user can import a command by
simply typing and selected it. This universal feature then guides the designer through
using particular tools. For example when typing the command “Loft” and
selecting it, it will ask the user to “Select curves to loft. Press Enter when
done.” After the user presses enter, the command is completed. The format for using any
command is the same as the one I just mentioned .This saves the time the
user spend looking for tool icons and helps solve problems if an error occurs
while trying to apply a command to a model.

The programme displays the designer’s
model on a screen cut into four different sections each showing varied view
points, Top, Front, Right and Perspective. This feature is accommodating for me
as I found when I drew a set of curves in the perspective view portal then orbited
around to see it at another angle and the curves where distorted. The points on
the curves had moved because I didn’t draw them in a side or top view. So to
edit the points whilst in one of these views I used the command points on, to manoeuvre
them into place and then typed points off into the command bar so I wouldn’t
move them without meaning it.

Viewing designs in a different
way complements the idea of viewing them in different angles, Wireframe,
Rendered and Ghosted are just three of the many viewing modes. I personally
like to view my perspective view in Ghosted as it allows me to see surfaces and
also look through them to see the wireframe of the model. Rendered view makes
the model look solid and realistic, but there is also a separate tool for
rendering in which the programme generating a 2D image. Lighting can also be
added to create shadows likewise making the model look lifelike.

During my first few sessions on
Rhinoceros I covered a lot of tools. Sweep, Loft, Revolve, Move, Scale, Rotate,
Extrude, Mirror Explode, Group, Join were the commands I first familiarized
myself with. After playing around with using different solid shapes and
surfaces I was able to produce a number of different rough models. As the tools
I learnt covered most of the skills required to produce them. Using these new
skills and commands I produced a number of rendered models.
Firstly I created a castle as it
was just solid shapes manipulated together to create something a little more
complex. The only problems I encountered during this were moving the shapes in
the place I wanted as I hadn’t mastered the snap and Osnap (Object-Snap)
options. Snap is where the curser snaps to the overlaying grid on the screen,
so you can move objects and curves effortlessly however the object wanted I to
move was not on the grid so I turned snap off and Osnap on. When I selected
Osnap it gave me a number of options, the ones I used were End, Centre, Near
and Mid because these permitted me to connect objects together when moving them.
Once I understand these I didn’t have many other problems. I then copied my
design three times and each time I did I edited them using the SCALE options
which were SCALE, SCALE 1D and SCALE 2D. I discovered that SCALE allowed me to
scale models using the height, length and width, SCALE 1D I could edit an
object using one axis and SCALE 2D using 2.

The second model I produced was a
torch which was challenging in the fact that more curved lines were involved
and I had to use complex commands. Loft, Extrude, Move, Offset, Sweep and Spilt
were the tools I used to create it. Split I learnt during the process because I
wanted to connect a button to the handle of the torch and is was just resting in-between
the handle and it was not linked. I established that split, splits the shape I
selected and created a curve along the line where the two objects met and also
allowed me to deleted the unwanted side. If I had went of the 3D print this
object I would have to check my model and if I had split all the other
overlaying objects as it would not print otherwise. Another tools that I found
useful was the Offset tool, which allowed me to copy an object underneath
itself but slightly smaller depending on the size I wanted. This was great for
creating the top fragment of the torch; after it was completed I lofted the two
sets of curves together creating a lip.

Napkins blowing in the wind were
my next challenge. This stretch my skills as other commands like Rotate and
Scale were necessary and also creating curved surfaces. I drew out two curves
and connected them through the mirror tool to produce four curves all connected
but not yet joined. So I joined them and used a tool that made me select the
four sides to create a surface from them. The surface was still a flat 2D shape
so using the points on option and adapted them in different view point creating
a 3D object. This was fairly straight forward and so was the next action which
was to rotate, copy and scale the different napkins to create the effect of a
bunch of free flowing napkins.
T create all the finished models
on this page I used the rending and lighting options. Inserting lights helped
me create shadow exactly where I wanted to make the model look that slightly
bit more realistic. Adding colour to components of my models also added to the
effect of real life as well as making them look attractive to people as
standard modelling grey is somewhat boring.

Tuesday, 22 October 2013
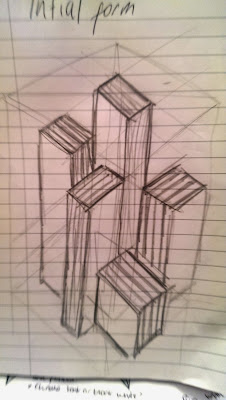
Digital Sculpture: Initial design ideas
These are my initial design ideas in response to a brief, titled "Digital Sculpture". The project requires I make one sculpture and one piece of merchandise, to be designed on Rhino Cad and produce using a laser cutter and/or 3D printer. The initial design thoughts pictured below are for my sculpture.
1) Bin-it: Geometrically formed giant bin symbol.

2) Floor of light: Mirrored geometric light.

3) Overflow: Bin with giant balls of paper.

4) Forever changing: White block balanced to stand on any side.

Growth: Horizontally stacked city scape.

My design station with some idea developments.

Tuesday, 15 October 2013
CONFIDENTIALITY / NON DISCLOSURE AGREEMENT
|
JM Design
33 Willingdon Road, Childwall Liverpool, L16 3NE JosephMarsh1995@gmail.com www.JMDesign.co.uk |
CONFIDENTIALITY / NON DISCLOSURE AGREEMENT
1.
For the purpose of this agreement:
“Confidential Information” means only information relating to products, models and samples, design concepts, finishes, technical specifications, manufacturing processes, research and development, disclosed to the recipient.
“Confidential Information” means only information relating to products, models and samples, design concepts, finishes, technical specifications, manufacturing processes, research and development, disclosed to the recipient.
2.
The recipient hereby undertakes and agrees:
To keep confidential and not to disclose to any other party the confidential information, or any part of the ideas and concepts behind the deliverables. Recipient may disclose information received if they are required under of a court of law, provided written notice so the party can relieve of the information safety without infringing this agreement.
To keep confidential and not to disclose to any other party the confidential information, or any part of the ideas and concepts behind the deliverables. Recipient may disclose information received if they are required under of a court of law, provided written notice so the party can relieve of the information safety without infringing this agreement.
3.
The disclosure of the confidential information
all occur within twelve months of the effective date of this agreement and the
provisions of this agreement shall begin on the date of and remain in force for
5 years form expiry of said period for disclosure.
4.
Any intellectual property rights in and to the confidential
information provided by Joseph Marsh shall remain property of Joseph Marsh
until a further agreement is signed.
5.
All agreements are not to change unless one of
the parties notifies the other with a written request to do so.
6.
If a party or both parties have a disagreement
and they do not come to a settlement with in thirty days starting from the date
the disagreement was proposed in writing the information can be given to a higher
source to be resolved in accordance to English law.
7.
The term in this agreement are in accordance
with English law.
Subscribe to:
Comments (Atom)